Core Data Explained
Jun 9, 2017 00:00 · 1662 words · 8 minutes read
Core data is one of the most misunderstood frameworks in iOS. If one understands the individual components of the framework and its usage, it is one of the easy to use frameworks. Lets go through the individual components to get an overview of this framework and see its usage through swift code snippets and throw away the frustration.
Core data framework is a model layer and persistent technology. It helps you build the model layer that represents the state of your application and perform store and retrieve operations of data through objects persistently. It is not just a SQL Wrapper, it is much more than that, the most powerful feature of core data is its object graph management and it provides higher level of abstraction of the database.
The main principle behind this framework is letting the app to store its data in the form of objects directly in to the database tables. It provides APIs which implements heavy operations like save, delete and fetch optimally.
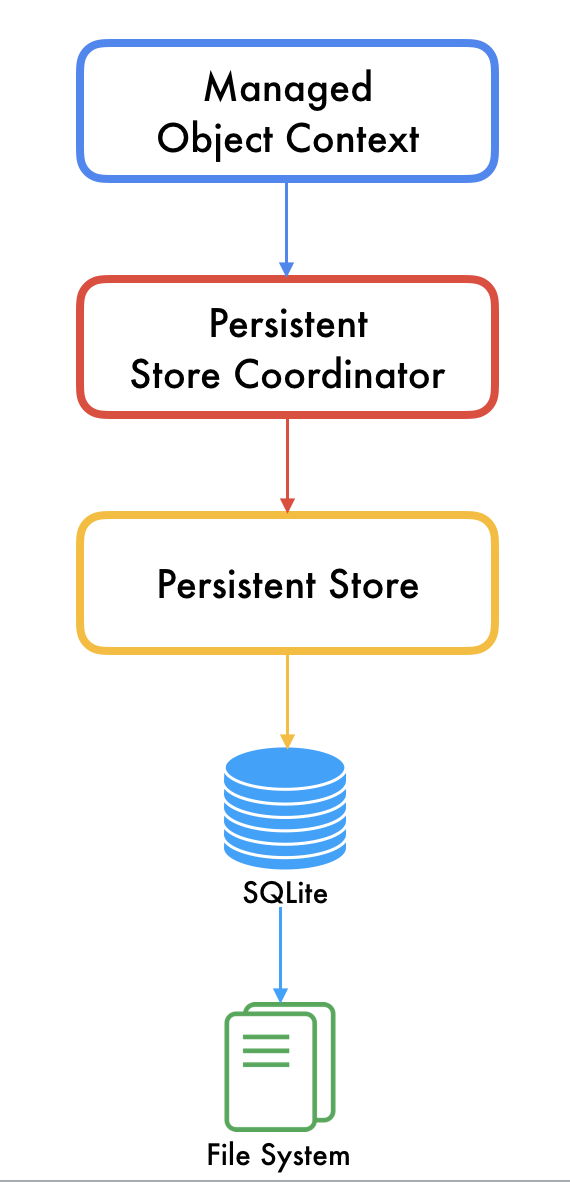
The Core data stack consists of four components as listed below.
- Managed Object Context
- Persistent Store Coordinator
- Persistent Store
- SQLite Store
All the components are inter linked and yet they are flexible to use. Lets go through each component.
Managed Object Context
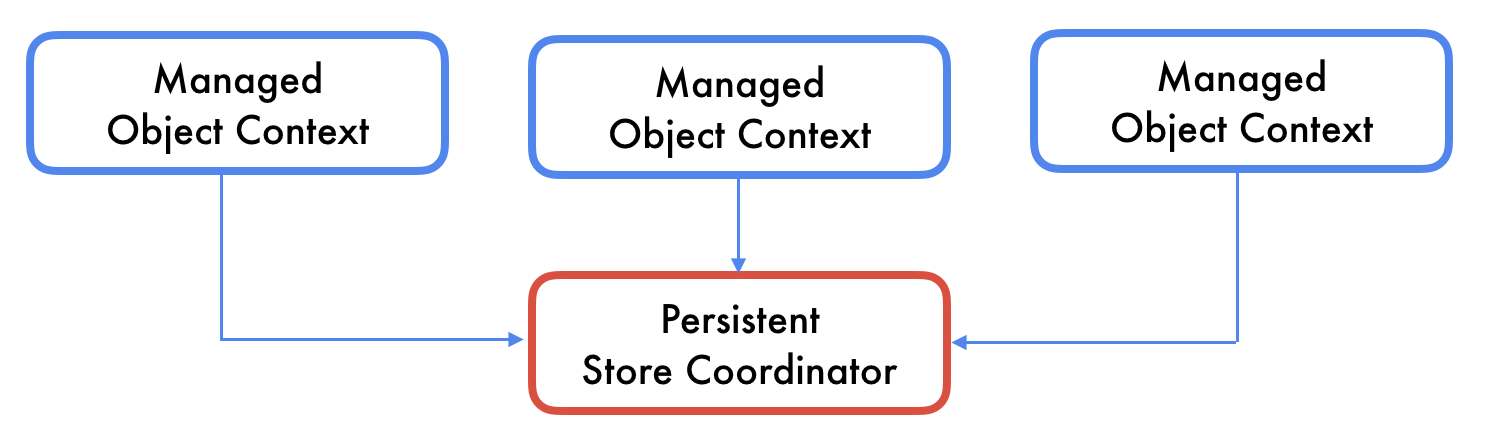
This component is the only component with which the app communicates. Consider this component as a scratch pad where you can write and read the objects and after all the changes made, you can save them to the store. Technically an application can have more than one context and each context can have any number of objects, the object knows in which context it is in and the context knows all its objects.
The object graph management is maintained in this component. Since it is in direct connection to the app, which creates the objects and saves them to the context and the context maintains the graph of these objects until they are saved in the store. For example, if we have an application with entities like student, faculty and department and corresponding tables in the database with established relationships. When you create a student object with a relation to department, Managed Object Context understands this and maintains the relationships and in future if you update any of the relationships it updates the graph accordingly, it is the same case with fetched objects from store.
Persistent Store Coordinator
As the name suggests this component coordinates the contexts and stores to which they are connected. It is like a central scrutinizer which connects the contexts and stores. Technically you can have many number of stores and contexts, so this component connects a particular context to a store. It ties the object management part and persistent storage part of this framework.
In earlier versions of iOS, before iOS 10, to use core data we had to create the complete stack from the persistent store coordinator to a store and context. But from iOS 10 the APIs are made easy to create the Core Data stack.
Persistent Store
This is the part of the stack where persistency happens. The persistent store gives the abstraction of actual database and it provides wrapper methods to the requests. Behind the scenes it creates SQL statements to the requests that it receives and stores them in the file system.
In case if you want to customize the store to use your own database rather than using standard SQLite store, you can achieve that by subclassing the NSIncrementalStore which is an abstract class to implement your own storage.
How these components work together?
Before I explain how they work together, let me introduce to the nomenclature used by Apple in Core Data framework and its contextual meaning.
Swift is slowly getting rid of the NS prefix to its APIs but it didn’t reach to the Core Data yet so as of today we still have NS prefix in Core Data. We are already familiar with Managed Object Context, Persistent Store Coordinator and Persistent Store, they are called NSManagedObjectContext, NSPersistentStoreCoordinator and NSPersistentStore respectively. Apart from them we have few more components as we dive deep in to the framework like, Managed Object Model (NSManagedObjectModel), Entity Description (NSEntityDescription), Fetch Request (NSFetchRequest), Mapping Model (NSMappingModel), Migration Manager (NSMigrationManager) etc.
Managed Object Model is simply a model that has the information of all the entity schemas, a store coordinator is created using this model, letting it know that what kind of objects it would see. You can have different versions of this models, as your app grows you might want to update the tables (or entities) by adding/deleting properties or adding new entities etc, in all these cases you will be creating a new version of this model.
Entity Description is associated to a specific entity and is represented as the entries of the persistent store. It also ties the entity object to the context in which it is going to be written, along with that it has other information related to entity management.
Fetch request is the abstraction of database queries to retrieve data. You can create general fetch request of all the objects of a specific entity or be more specific and define the filters on attributes like SQLite queries by adding predicate (NSPredicate) to the request.
Mapping model and migration manager are handy components when you are dealing with migration of schema and data in the database. Mapping model explicitly defines the mapping from old schema to the new schema to ease the migration process. This is consumed by the migration manager which performs the actual migration. See the flow diagram give below to understand the Core Data stack.
.mom file that is created by this data model that we created, can be referred as file-manager path URL by the persistent store coordinator.
Once we have entities created, we want the app to create few records or consume them, for this we need a context to write and read, lets go ahead and create a context. To define the context we need a store coordinator to connect with and to create the store coordinator we need managed object model because the store coordinator should know what objects it is talking with.
// First get the model URL, for that look for .mom
// file in the directory with the resource name as the name of your .xcdatamodel

let bundle = Bundle.main
let modelPath = bundle.path(forResource: resource, ofType: "mom")
modelUrl = URL(fileURLWithPath: modelPath!)

// Create the model and persistent store coordinator
let model = NSManagedObjectModel(contentsOf: modelUrl)
let coordinator = NSPersistentStoreCoordinator(managedObjectModel: model!)

// Create context and link it to the store coordinator
let context = NSManagedObjectContext(concurrencyType: .mainQueueConcurrencyType)
context.persistentStoreCoordinator = coordinator
Wondering why we haven’t created the persistent store explicitly? Well, it is done silently by Persistent Store Coordinator, by default it creates NSSQLiteStore but in case if you want to create your own store in place of the default behavior you can do that as given below.
NSPersistentStoreCoordinator.registerStoreClass(CustomStoreClass.self,
 forStoreType: CustomStoreType)

let store = try coordinator.addPersistentStore(ofType: CustomStoreType,
configurationName: nil, at: storeUrl, options: storeOptions)
To define your own store you need to subclass NSIncrementalStore and implement the persistent store protocol methods and register it to the store coordinator to link to this new store instead of the default store.
Once we have the context, we can add objects, fetch and delete. Some of the operations are give below.
// Save
let wine = Wine(entity: wineEntity, insertInto: context)
wine.wineId = 12562
wine.name = "Wine Pro"
wine.wineDescription = "Wine Pro"
wine.type = "Oldest wines"
wine.year = 1970

context.save()

// Fetch
let wineFetch = NSFetchRequest<Wine>(entityName: "Wine")
wineFetch.predicate = NSPredicate(format: "wineDescription BEGINSWITH[cd] %@", "Wine")

let wineCount = try context.count(for: wineFetch)
From iOS 10+ creating core data stack made very simple, Apple added another layer of abstraction to handle the stack creation in the class NSPersistentContrainer which creates the stack and using the object of this class you can access the context through its parameters and perform the operations.
lazy var persistentContainer: NSPersistentContainer = {
      /*
       The persistent container for the application. This implementation
       creates and returns a container, having loaded the store for the
       application to it. This property is optional since there are legitimate
       error conditions that could cause the creation of the store to fail.
      */
      let container = NSPersistentContainer(name: "ToDO_App")
      container.loadPersistentStores(completionHandler: { (storeDescription, error) in
          if let error = error as NSError? {
              // Replace this implementation with code to handle the error appropriately.
              // fatalError() causes the application to generate a crash log and terminate. You should not use this function in a shipping application, although it may be useful during development.

              /*
               Typical reasons for an error here include:
               * The parent directory does not exist, cannot be created, or disallows writing.
               * The persistent store is not accessible, due to permissions or data protection when the device is locked.
               * The device is out of space.
               * The store could not be migrated to the current model version.
               Check the error message to determine what the actual problem was.
               */
              fatalError("Unresolved error \(error), \(error.userInfo)")
          }
      })
      return container
  }()

func saveContext () {
      let context = persistentContainer.viewContext
      if context.hasChanges {
          do {
              try context.save()
          } catch {
              // Replace this implementation with code to handle the error appropriately.
              // fatalError() causes the application to generate a crash log and terminate. You should not use this function in a shipping application, although it may be useful during development.
              let nserror = error as NSError
              fatalError("Unresolved error \(nserror), \(nserror.userInfo)")
          }
      }
  }
Some of the good articles that I referred while I was working on core data are given below.